Contents
1. Introduction
Quartz.NET is a powerful library that help to create the schedule job on .Net project, you can setup and execute the schedule job on IIS, that will be very convenient for a web application. But there is a problem for running schedule job on IIS, if there is no access for a long time in a website, IIS will be stop running the schedule job, but don’t worry, I will let you know how to fix this issue, and I will show you how to create a setting to control the schedule job.
2. Install Quartz.NET
You can easy to install Quartz.NET from NuGet Package in Visual Studio, just search Quartz in Manage NuGet Packages and choose Quartz.NET to install.
Or you also can execute below command to install if you are using Visual Studio Code
Install-Package Quartz
3. Usage
Actually, you can find the detail usage from Quartz.NET official website, so today, I will show you how to use Quartz.NET as a background service in ASP.NET Core project, and you can easy setup it in your app.settings
- Create Schedule Model
We need to create the model for app.settings mapping
//JobSettings.cs

namespace API.Schedules
{
    /// <summary>
    /// Schedule Job Settings Section in appsettings.json
    /// </summary>
    public class JobSettings
    {
        public List<JobDetail> Jobs { get; set; }
        public JobSettings()
        {
            Jobs = new List<JobDetail>();
        }
    }

    /// <summary>
    /// Schedule Job Detail
    /// </summary>
    public class JobDetail
    {
        /// <summary>
        /// The type name of the job's class for reference
        /// </summary>
        /// <value></value>
        public required string TypeName { get; set; }
        /// <summary>
        /// The unique key of the job
        /// </summary>
        /// <value></value>
        public required string JobKey { get; set; }
        /// <summary>
        /// Set the schedule with cron expressions
        /// </summary>
        /// <value></value>
        public string? CronSchedule { get; set; }
        /// <summary>
        /// Schedule interval in seconds
        /// </summary>
        /// <value></value>
        public int? IntervalSeconds { get; set; }
        /// <summary>
        /// Schedule interval in minutes
        /// </summary>
        /// <value></value>
        public int? IntervalInMinutes { get; set; }
        /// <summary>
        /// Schedule interval in hours
        /// </summary>
        /// <value></value>
        public int? IntervalInHours { get; set; }
        /// <summary>
        /// Whether the job is active
        /// </summary>
        /// <value></value>
        public bool IsActive { get; set; }
    }
}
- Create the Schedule Service
Create the schedule service for register background service
//ScheduleService.cs

using Quartz;

namespace API.Schedules
{
    public static class ScheduleService
    {
        public static void RegisterBackgroundServices(this IServiceCollection services, JobSettings jobSettings)
        {
            // Register the job settings
            jobSettings.Jobs.Where(s => s.IsActive).ToList().ForEach(setting =>
            {
                // Use a Scoped container to create jobs. This is necessary to inject services into the job.
                services.AddQuartz(options =>
                {
                    // Register the job with TypeName
                    Type? _f = Type.GetType(setting.TypeName);
                    if (_f != null)
                    {
                        var jobKey = JobKey.Create(setting.JobKey);

                        if (!string.IsNullOrEmpty(setting.CronSchedule))
                            //trigger with cron expressions
                            options.AddJob(_f, jobKey).AddTrigger(trigger => trigger.ForJob(jobKey).WithCronSchedule(setting.CronSchedule).StartNow());
                        else if (setting.IntervalSeconds.HasValue)
                            //trigger with IntervalSeconds
                            options.AddJob(_f, jobKey).AddTrigger(trigger => trigger.ForJob(jobKey)
                                .WithSimpleSchedule(s => s.WithIntervalInSeconds(setting.IntervalSeconds.Value).RepeatForever()));
                        else if (setting.IntervalInMinutes.HasValue)
                            //trigger with minutes
                            options.AddJob(_f, jobKey).AddTrigger(trigger => trigger.ForJob(jobKey)
                                .WithSimpleSchedule(s => s.WithIntervalInMinutes(setting.IntervalInMinutes.Value).RepeatForever()));
                        else if (setting.IntervalInHours.HasValue)
                            //trigger with hours
                            options.AddJob(_f, jobKey).AddTrigger(trigger => trigger.ForJob(jobKey)
                                .WithSimpleSchedule(s => s.WithIntervalInHours(setting.IntervalInHours.Value).RepeatForever()));
                    }
                });
            });
            // Add the Quartz services
            services.AddQuartzHostedService(options =>
            {
                options.WaitForJobsToComplete = true;
                options.AwaitApplicationStarted = true;
            });
        }
    }
}
and register schedule job settings in Program.cs file
builder.Services.Configure<JobSettings>(builder.Configuration.GetSection("JobSetting"));

builder.Services.RegisterBackgroundServices(builder.Configuration.GetSection("JobSetting").Get<JobSettings>() ?? new JobSettings());
- Add the settings
We can add the JobSetting section into app.settings for easy to control the schedule jobs
  "JobSetting": {
    "Jobs": [
      {
        "TypeName": "API.Schedules.CronBgJob, API",
        "JobKey": "CronScheduler",
        "CronSchedule": "0 30 9,14,16,23,7 * * ?", //trigger the job every day at 9:30,14:30...
        "IsActive": true
      },
      {
        "TypeName": "API.Schedules.SimpleBgJob, API",
        "JobKey": "SimpleScheduler",
        "IntervalInMinutes": 10,  //trigger the job in every 10 minutes
        "IsActive": true
      }
    ]
  },
There are two jobs of the above settings, one for cron job with cron expressions, you can find the details how to use it, another is a simple job, it will trigger in every 10 minutes when the application is startup.
Of course, you can also set the interval with seconds or hours in the settings, because we already handled these in the schedule job service.
- Create the jobs
Now we can create the jobs. First we create a cron job below
//CronBgJob.cs

using Quartz;
namespace API.Schedules
{
    [DisallowConcurrentExecution]
    public class CronBgJob : IJob
    {
        private readonly ILogger<CronBgJob> _logger;

        public CronBgJob(ILogger<CronBgJob> logger)
        {
            _logger = logger;
        }

        public Task Execute(IJobExecutionContext context)
        {
            _logger.LogDebug("this is a cron job ");
            Console.WriteLine("testing cron job log in schedule");
            return Task.CompletedTask;
        }
    }
}
Create a simple job
//SimpleBgJob.cs

using Quartz;
namespace API.Schedules
{
    [DisallowConcurrentExecution]
    public class SimpleBgJob : IJob
    {
        private readonly ILogger<SimpleBgJob> _logger;

        public SimpleBgJob(ILogger<SimpleBgJob> logger)
        {
            _logger = logger;
        }

        public Task Execute(IJobExecutionContext context)
        {
            _logger.LogDebug("this is a simple job ");
            Console.WriteLine("testing simple job log in schedule");
            return Task.CompletedTask;
        }
    }
}
As you can see, there is no any difference with these jobs except the class name, so the main point is the app.settings to define the job’s type and how to trigger them.
4. Setup the IIS
By default IIS will recycle and stop the app pools from time to time, that’s mean if you start the Quartz with a web application, the scheduler might get disposed later on due to site inactivity. But you are using IIS8, you can setup the IIS to let it keep running to resolve this issue.
1) Install the Application Initialization module in IIS

2) Go to IIS website advanced settings, set the Preload Enabled to True
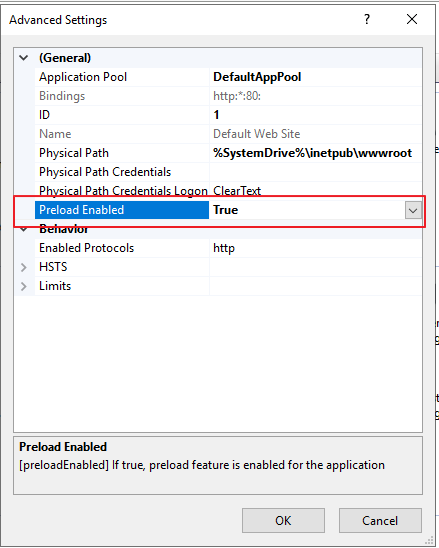
The `Preload Enabled` setting along with the start mode setting can be used to ‘warm up’ your web application.
3) Go to the application pool advanced settings, set the Start Mode to AlwaysRunning
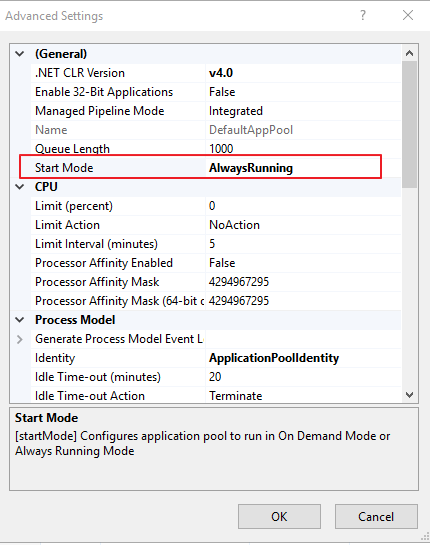
When you set the startMode property of your application pool to AlwaysRunning a worker process is spawned as soon as IIS starts up and does not wait for the first user request.
5. Conclusion
Quartz.NET is a great library for handle schedule job of .Net project, you can use the cron expressions to set the schedule, and there are still many features you can find in the official guideline, you just need to pay attention to the IIS recycle issue, it will stop your job, but you can also fix it base on the above settings.
In the end, if you enjoyed this article, please follow me here on Medium for more stories about .Net Core, Angular, and other Tech!
![]()
About the Author
Related posts:
 The Art of Service Registration: Writing Clean and Scalable IServiceCollection Extensions
 Create Paging Data from .Net Core Api
 How to setup and restart the cron job on a Synology NAS
 Create .Net Core Api controller for CRUD with repository
 How to use code first and data migration with ServiceStack.OrmLite