Contents
1. Introduction
Documents are very important for a project, especially the company’s project. There are many Document Management Systems (DMS) in the market, most of them need to host a server for publishing and it’s complex to set up and deploy, so I think there are not my choice until I found the MkDocs :smiley:
2. MkDocs
Which DMS should you want to use that base on what’s your requirements. I choice the MkDocs because it met my below requirements:
1) Don’t need to deploy to a server
2) Faster and easy to use
3) There are beauty layouts or themes
4) Can generate the PDF file
5) Support markdown (this is important for me)
6) Cross-Platform
MkDocs is a free python base project, although I am a .Net programmer but I still like it! The below description from the official website:
MkDocsis a fast, simple and downright gorgeous static site generator that’s geared towards building project documentation. Documentation source files are written in Markdown, and configured with a single YAML configuration file. Start by reading the introductory tutorial, then check the User Guide for more information.
Yes, it can generate a static html website, so if you really want to host it you also can easy to do that otherwise you can generate a PDF for all the documents.
3. Start To Use
Although MkDocs is a python project, but don’t worry, you just use it and even don’t need to know any python knowledge, but you need to install the python environments, and if you are using VS Code, that’s will be very easy, you can goto here for more detail
Ok, after setup python, we can install the MkDocs. Create a new folder for your Doc project and open it in VS Code, run the below command in VS Code terminal
pip install mkdocs
and run below command for create a new doc project
mkdocs new my-demo-doc
and you will find the simple project and structure as below

you can put all of the markdown files into docs folder and then start the server by running below command in my-demo-doc folder
mkdocs serve
it will start a server on http://127.0.0.1:8000/

and you can see the default template layout

Great! Ok, let’s do more details.
4. Add the Pages
For adding the pages just need to create a markdown file (*.md) into docs folder will be ok. And surprising that after you update any docs or add the new file, the MkDocs server will auto update, that’s mean you don’t need to restart the server to preview the new updates
For example, I just added an about.md file and set the markdown title

and the server will auto update and refresh the page, it will add the title to the top menu

Of course, you can define the menu title and structure in mkdocs.yml config file
site_name: My Demo Docs
site_url: https://www.coderblog.in/
nav:
  - Home: index.md
  - About: about.md
and the page will be updated

Ok, these are the base usage for MkDocs, if you want to know more details, you can goto the official website to read the document. What I want to show you that didn’t mentioned in official document 🙂
5. The Material for MkDocs
This is a very powerful documentation framework on top of MkDocs, it’s already integrated many of great extensions and features that’s very helpful.
5.1. Install
Run the below command for install the Material for MkDocs
pip install mkdocs-material
5.2. Usage
Set the current MkDocs theme to material in the config file
# mkdocs.yml

theme:
    name: material
and it’s need to restart the server again, you will see the new theme layout

Very Nice! Actually, you can do more customization such add the additional css, javascript and extending the theme, here is the detail document to show you how to do it.
and you also can do a lot of setup for the features, here is my config for enable the features
  features:
    - navigation.instant
    - navigation.sections
    - navigation.tabs
    - navigation.tabs.sticky
    - navigation.path
    - navigation.top
    - navigation.footer
    - navigation.tracking
    - navigation.sections
    - search.suggest
    - search.highlight
    - toc.follow
    - content.code.copy
you can find the detail for navigation and search and the table of contents, the last one for support copy the source code in code area
and you can also set the palette (e.g enable the switch for dark mode) and font
  palette:
    - scheme: default
      primary: indigo
      accent: indigo
      toggle:
        icon: material/toggle-switch-off-outline
        name: Switch to dark mode
    - scheme: slate
      primary: red
      accent: red
      toggle:
        icon: material/toggle-switch
        name: Switch to light mode
  font:
    text: Roboto
    code: Roboto Mono
6. Plugins
One of the powerful of MkDocs is support many of plugins, and if you want to generate PDF then you can install a plugin mkdocs-with-pdf
pip install mkdocs-with-pdf
and add the config
plugins:
    - with-pdf
but you need to install the WeasyPrint first, you can goto the official site to find the detail install guide.
And of course you can do more settings for the PDF file, for example, set the author, file title, copyright, output file path …
plugins:
    - with-pdf:
        author: Winson
        cover_subtitle: My Demo Doc
        copyright: Copyright © 2023 CoderBlog.in
        output_path: .\My_Demo_Doc.pdf
        # toc_level: 2
        # two_columns_level: 3
        # enabled_if_env: ENABLE_PDF_EXPORT
because the plugin will generate PDF every time when start the server, if there are many documents in your project, this will cause a long times, so you can disable it in development mode with below
enabled_if_env: ENABLE_PDF_EXPORT
run the build project, and you will find there is a PDF in the site folder
mkdocs build

The PDF looks great, but that’s can’t find in the document website, so we can add a download link for that. The mkdocs-with-pdf plugin support use the event hook, we can add the download link with hook.
create a folder pdf_event_hook in root, and create the init python script __init__.py
import logging

from bs4 import BeautifulSoup
from mkdocs.structure.pages import Page


def inject_link(html: str, href: str,
                page: Page, logger: logging) -> str:
    """Adding PDF View button on navigation bar(using material theme)"""

    def _pdf_icon():
        _ICON = '''
<svg xmlns="http://www.w3.org/2000/svg" viewBox="0 0 512 512">
<path d="M128,0c-17.6,0-32,14.4-32,32v448c0,17.6,14.4,32,32,32h320c17.6,0,32-14.4,32-32V128L352,0H128z" fill="#E2E5E7"/>
<path d="m384 128h96l-128-128v96c0 17.6 14.4 32 32 32z" fill="#B0B7BD"/>
<polygon points="480 224 384 128 480 128" fill="#CAD1D8"/>
<path d="M416,416c0,8.8-7.2,16-16,16H48c-8.8,0-16-7.2-16-16V256c0-8.8,7.2-16,16-16h352c8.8,0,16,7.2,16,16  V416z" fill="#F15642"/>
<g fill="#fff">
<path d="m101.74 303.15c0-4.224 3.328-8.832 8.688-8.832h29.552c16.64 0 31.616 11.136 31.616 32.48 0 20.224-14.976 31.488-31.616 31.488h-21.36v16.896c0 5.632-3.584 8.816-8.192 8.816-4.224 0-8.688-3.184-8.688-8.816v-72.032zm16.88 7.28v31.872h21.36c8.576 0 15.36-7.568 15.36-15.504 0-8.944-6.784-16.368-15.36-16.368h-21.36z"/>
<path d="m196.66 384c-4.224 0-8.832-2.304-8.832-7.92v-72.672c0-4.592 4.608-7.936 8.832-7.936h29.296c58.464 0 57.184 88.528 1.152 88.528h-30.448zm8.064-72.912v57.312h21.232c34.544 0 36.08-57.312 0-57.312h-21.232z"/>
<path d="m303.87 312.11v20.336h32.624c4.608 0 9.216 4.608 9.216 9.072 0 4.224-4.608 7.68-9.216 7.68h-32.624v26.864c0 4.48-3.184 7.92-7.664 7.92-5.632 0-9.072-3.44-9.072-7.92v-72.672c0-4.592 3.456-7.936 9.072-7.936h44.912c5.632 0 8.96 3.344 8.96 7.936 0 4.096-3.328 8.704-8.96 8.704h-37.248v0.016z"/>
</g>
<path d="m400 432h-304v16h304c8.8 0 16-7.2 16-16v-16c0 8.8-7.2 16-16 16z" fill="#CAD1D8"/>
</svg>
'''  # noqa: E501
        return BeautifulSoup(_ICON, 'html.parser')

    logger.info('(hook on inject_link: %s)', page.title)
    soup = BeautifulSoup(html, 'html.parser')

    nav = soup.find(class_='md-header-nav')
    if not nav:
        # after 7.x
        nav = soup.find('nav', class_='md-header__inner')
    if nav:
        a = soup.new_tag('a', href=href, title='PDF',
                         **{'class': 'md-header-nav__button md-icon'})
        a.append(_pdf_icon())
        nav.append(a)
        return str(soup)

    return html
restart the MkDocs server, and then you will find there is a PDF download icon near search box

8. Custom the theme
You can also easy to custom the theme. The material is an open source project, so you can download all of the codes from github. We can take a look the theme structure
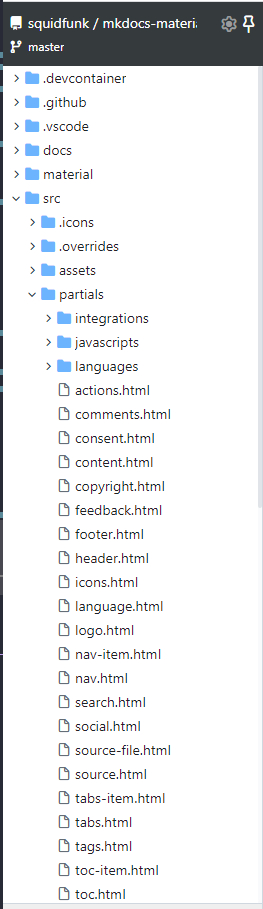
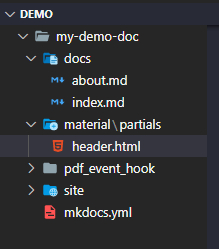
for example, we want to add a description to website title, and the title will be show with material\partials\header.html, so we just need to create the folder structure and copy the original header.html to change it
find the site name code and add the description what you want

update the config file, set the custom_dir
theme:
  name: material
  custom_dir: material
restart the MkDocs server, and then you will find the layout has been updated

9. Syntax Highlight
For a programming document, we must be handle the syntax highlight! Material can support this very well. We can use the extensions for that
markdown_extensions:
  - pymdownx.highlight:
      anchor_linenums: true
      line_spans: __span
      pygments_lang_class: true
      auto_title: true
      linenums: true
after that, you will can find the syntax highlight as below

There are still many of useful extensions can be use, you find here.
10. Summarize
MkDocs is really powerful, but as I said before, what document management system should you use just based on your requirements. I am very love to use markdown for documentation and I think MkDocs can fulfill all I want. Actually, there are still many great features I didn’t mention, for example, you can also create a simple blog with it if you are interested, you can go to the MkDocs Catalog for more, there are many themes and plugins waiting for you! :laughing:
![]()